I haven't done a quilt since we moved back to the states in high school. It was a pin wheel wall quilt that mom and my sister and I did together.
I am going to do the Joseph's Coat Quilt in scrappy greens. I'm thinking a beige cream for the background. Phillip wants brown or tan, but I am thinking that may be too dark. We'll see... I am still collecting greens. I think I am up to 1.5 yards or so of the 4.5 yards needed.
I've cut my 1st template ever. I think I bought the wrong kind. It was the thicker one. I think for this project the thinner template plastic would have been a better choice.
I also have 2 dresses cut out and ready to sew up for the summer. Can't wait!
Monday, May 31, 2010
Sunday, May 16, 2010
Pins and needles
Tomorrow is the big day according the the DC# I got in my email from the Loopy Ewe. My favorite "local yarn store". ;) They really aren't local like in town. but the shipping is fast enough that they might as well be. :) The have a HUGE selection of yarns. I even got some Wollmeise from them once! I love that stuff!!! And now I have enough of that color (Dunkle Kirsch) to make myself a cardigan. if only I could make up my mind on the pattern.
So tomorrow is the big day is the for my sock kit light. I can wait to see what's in it. May next year I will win the lotto and get in on the sock kit club :D
So tomorrow is the big day is the for my sock kit light. I can wait to see what's in it. May next year I will win the lotto and get in on the sock kit club :D
Friday, May 14, 2010
Boxbag Tutorial
This tutorial is for my friend Elaine and anyone else having a hard time learning how to make one of these bags. Have fun!
I will say right now this is SUPER picture heavy. I may have to split into two posts. We'll see :D
This tutorial is being done without a zipper foot. Not everyone has one. I do, but I thought I would do it this way. Sometimes it's a pain to keep switching them out.
First off you will need two fabrics, interfacing, a long zipper, tape measure, and some pins.
Cut your materials 16x12, 17x13 somewhere close. Or bigger! Your zipper needs to be 2-3 inches longer than the short side.

Next we place the zipper on the main fabric upside down with the fabric right side up.

Then we line the interior fabric wrong side up, and pin them all together, making sure everything is lined up straight at the top.

This sewing foot has three lines and a clear viewing area. My needle is set for the center line. The fabric is filling the entire viewing area. The metal bar of the foot is against the zipper. You can feel the zipper with your fingers as you guide the materials along. This should help keep you a straight line, not always though.

We made to the end! So far everything looks great.
 Now, turn your fabrics so that the zipper is on one side like this and finger press. Then start sewing. You want about an eighth inch seam on the fabric side.

Now back to square one. Main fabric facing up with interfacing underneath. Zipper then the interior fabric facing down.
 It will look like this when you hold it up in the air.

Here is where you repeat everything you did on the first side of the zipper. Now it time to put your hand into the main fabric tube and pull it out.
 It will look like this. One side has the finished edge the other does not.
 It is now time to fix that. Unzip the bag . Finger press again and sew. Pick the side that is most comfortable for you. Zipper on the left or right. I don't know why this picture flipped. But if you look close the metal bar on the presser foot is "in the ditch". This is a good thing. I moved my needle to the the left notch position. This is a guaranteed straight line :)
 Here we are at the end of the zipper. It's not that bad. Just make sure to keep the rest of the bag material out of the way and to turn the zipper straight :)

Now we need to bring in the measuring tape and pins. You are looking for the center. Always measure. And do it for both ends. Pin it to keep the zipper from sliding. ETA open the zipper halfway so you can open the bag at the end!
 Now I actually forgot about the handle and tab. But found these in my scrap pile. Whew! They were already finished and measure 12 inches by 1 inches-ish. They were probably the same width of the short end of the fabric by 3-4 inches. Then double folded and sewn down both edges. I just cut the other one short so it could be a tab. ;)

Here is the placement of them. Zipper end gets the tab, and zipper head gets the handle. Rough edges to rough edges. Curve to the inside.

 Find the spot you want for your seam on the sides. It isn't always going to be 5/8's or 1/2 inch. I left the selvage on the brown fabric so this time I thought it would be quite a bit. I was wrong... I have had to cut off an inch or more on one side and only a little on the other. It evens out sometime LOL Always backstitch a few time on the zippers/handles, they get a real workout.
 This is really important. PLEASE be careful when you are trimming the extra off! That bunch right there in the middle can be thick depending on the fabric you choose, and if your scissors slip or twist you could really get hurt.... Oh and those dots... I poked my self with a pin. :(
 Here we are all trim and no cutting accidents :) Did I forget to mention to make sure the zipper was open half way before sewing ends shut... I am so sorry if you made it this far. Let me edit that right now!
 This is the magic spot on my machine for making corners. Anywhere else and they come out wonky.
 It's time to make the corners.... I know its the scary part. Here is a front and back picture of the first corner before sewing.

 I line up the corner with that magic spot. Pull back and start sewing.
 This is an aerial view of a corner with the handle end. You don't want it in the way.
 Here I am making sure the triangles are the same size before I start sewing again.
 Here we are. All the corners are done! Almost home free. :)
 Clip the corners off leaving about a quarter inch. If you have pinking shears, even better.
 Tada!! All done. You should feel super! You did a great job finishing this. Hopefully it was easy for you. I had the hardest time figuring out how to do one of these things on my own :D

Notes*
Finger pressing - using your fingers to even out the fabric and flatten it before sewing.
Pinking shears - larger heavy scissors that cut zig zaggy triangle edges on your fabric to prevent fraying/unraveling.
I will say right now this is SUPER picture heavy. I may have to split into two posts. We'll see :D
This tutorial is being done without a zipper foot. Not everyone has one. I do, but I thought I would do it this way. Sometimes it's a pain to keep switching them out.
First off you will need two fabrics, interfacing, a long zipper, tape measure, and some pins.
Cut your materials 16x12, 17x13 somewhere close. Or bigger! Your zipper needs to be 2-3 inches longer than the short side.

Next we place the zipper on the main fabric upside down with the fabric right side up.

Then we line the interior fabric wrong side up, and pin them all together, making sure everything is lined up straight at the top.

This sewing foot has three lines and a clear viewing area. My needle is set for the center line. The fabric is filling the entire viewing area. The metal bar of the foot is against the zipper. You can feel the zipper with your fingers as you guide the materials along. This should help keep you a straight line, not always though.

We made to the end! So far everything looks great.
 Now, turn your fabrics so that the zipper is on one side like this and finger press. Then start sewing. You want about an eighth inch seam on the fabric side.
Now back to square one. Main fabric facing up with interfacing underneath. Zipper then the interior fabric facing down.
 It will look like this when you hold it up in the air.
Here is where you repeat everything you did on the first side of the zipper. Now it time to put your hand into the main fabric tube and pull it out.
 It will look like this. One side has the finished edge the other does not.
 It is now time to fix that. Unzip the bag . Finger press again and sew. Pick the side that is most comfortable for you. Zipper on the left or right. I don't know why this picture flipped. But if you look close the metal bar on the presser foot is "in the ditch". This is a good thing. I moved my needle to the the left notch position. This is a guaranteed straight line :)
 Here we are at the end of the zipper. It's not that bad. Just make sure to keep the rest of the bag material out of the way and to turn the zipper straight :)
Now we need to bring in the measuring tape and pins. You are looking for the center. Always measure. And do it for both ends. Pin it to keep the zipper from sliding. ETA open the zipper halfway so you can open the bag at the end!
 Now I actually forgot about the handle and tab. But found these in my scrap pile. Whew! They were already finished and measure 12 inches by 1 inches-ish. They were probably the same width of the short end of the fabric by 3-4 inches. Then double folded and sewn down both edges. I just cut the other one short so it could be a tab. ;)
Here is the placement of them. Zipper end gets the tab, and zipper head gets the handle. Rough edges to rough edges. Curve to the inside.

 Find the spot you want for your seam on the sides. It isn't always going to be 5/8's or 1/2 inch. I left the selvage on the brown fabric so this time I thought it would be quite a bit. I was wrong... I have had to cut off an inch or more on one side and only a little on the other. It evens out sometime LOL Always backstitch a few time on the zippers/handles, they get a real workout.
 This is really important. PLEASE be careful when you are trimming the extra off! That bunch right there in the middle can be thick depending on the fabric you choose, and if your scissors slip or twist you could really get hurt.... Oh and those dots... I poked my self with a pin. :(
 Here we are all trim and no cutting accidents :) Did I forget to mention to make sure the zipper was open half way before sewing ends shut... I am so sorry if you made it this far. Let me edit that right now!
 This is the magic spot on my machine for making corners. Anywhere else and they come out wonky.
 It's time to make the corners.... I know its the scary part. Here is a front and back picture of the first corner before sewing.
 I line up the corner with that magic spot. Pull back and start sewing.
 This is an aerial view of a corner with the handle end. You don't want it in the way.
 Here I am making sure the triangles are the same size before I start sewing again.
 Here we are. All the corners are done! Almost home free. :)
 Clip the corners off leaving about a quarter inch. If you have pinking shears, even better.
 Tada!! All done. You should feel super! You did a great job finishing this. Hopefully it was easy for you. I had the hardest time figuring out how to do one of these things on my own :D
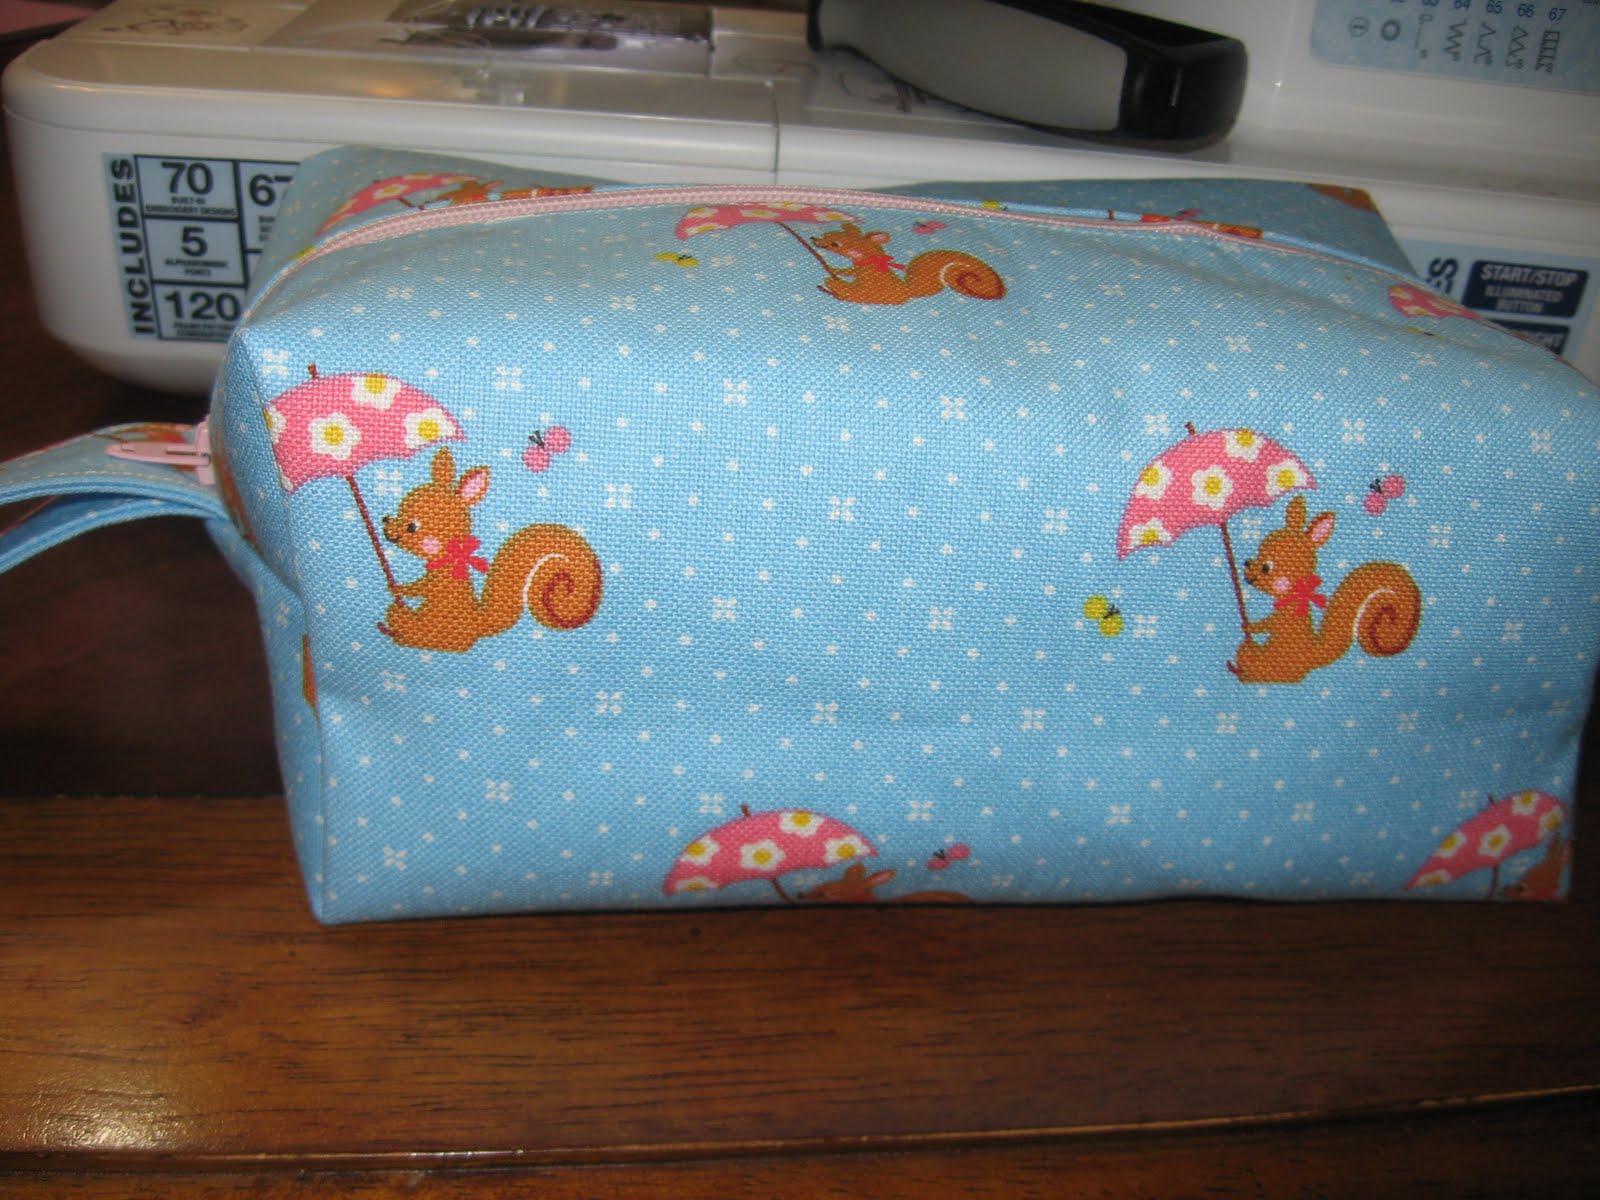
Notes*
Finger pressing - using your fingers to even out the fabric and flatten it before sewing.
Pinking shears - larger heavy scissors that cut zig zaggy triangle edges on your fabric to prevent fraying/unraveling.
Subscribe to:
Posts (Atom)